
If fall had a flavor, this would be it. 🍂 Imagine the comforting warmth of pumpkin spice, the soft chew of a perfectly baked cookie, and gooey chocolate chips in every bite—that’s what you get with these Pumpkin Chocolate Chip Cookies. Whether you're baking for a cozy night in, a fall bake sale, or just because you're craving something sweet and seasonal, this recipe is a must-try.
I read somewhere that the hardest part of being an adult is figuring out what to cook for dinner every single night for the rest of your life. Though I disagree that planning dinners is the hardest thing adulting has to offer, I sympathize with the stress behind the constant meal planning. The weeks that I've planned, grocery shopped, and prepped in advance of the craziness are the smoothest meal times (and make me feel accomplished as a wife and mom).
Here are 5 chicken recipes you can make with the same core ingredients and a single package of chicken breasts or thighs or even a cooked rotisserie chicken.
1. Chicken Enchilada Lasagna (Pampered Chef)
3. King Ranch Chicken casserole

4. Chicken Pot Pie

5. Chicken chilaquiles
You can make these in almost any order, but you will need to have made the Crockpot "Roast" Chicken before the pot pie, because your leftovers become the pot pie filling with just a few tweaks!
Click into each recipe above for full details, and here is a cursory grocery list that assumes you have some pantry staples and seasonings.
Shopping List:
- 1 rotisserie chicken or package of chicken thighs or breasts
- Monterrey jack cheese
- 1 can of green chili peppers
- 1 lb carrots
- 2 lbs baby red or golden potatoes
- 2-3 onions
- corn tortillas
- 1 bag frozen peas
- 1 can red enchilada sauce
- green tomatillo sauce
- chicken broth (also something you could make yourself by boiling the bones from your rotisserie chicken)
- pie crust (or follow this recipe for the best pie crust you will ever eat!)

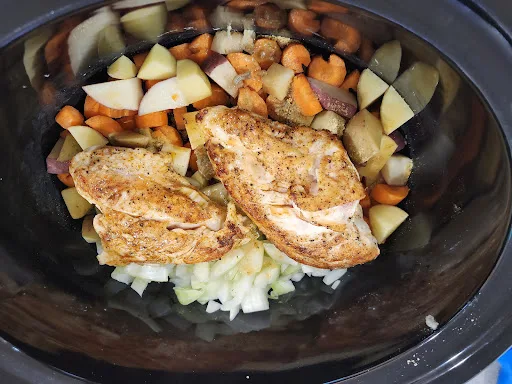
This is my cheat on a typical Sunday roast: roasted chicken and well-seasoned veggies are always a good comfort food. You can eat this as a stew or make a great chicken pot pie filling. There’s something timeless and comforting about a classic Sunday roast—but let’s be honest, not everyone has hours to spend in the kitchen basting and babysitting the oven. That’s where this Crockpot “Roast” Chicken with Carrots & Potatoes comes in. It delivers all the cozy, home-cooked flavors of a traditional roast dinner without the stress of roasting an entire chicken in your oven.

Whether you're a newlywed learning your way around the kitchen or just looking to impress without the mess, this easy slow cooker recipe is a low-effort, high-reward meal that feels like a warm hug at the end of a long week.
EQUIPMENT:
Crockpot "Roast" Chicken with Carrots & Potatoes
Author: Morgan
Preparation Time: 10 min
Cooking time:
Servings: 6
Category: Dinner
Author: Morgan
Preparation Time: 10 min
Cooking time:
Servings: 6
Category: Dinner
Whether you're a newlywed learning your way around the kitchen or just looking to impress without the mess, this easy slow cooker recipe is a low-effort, high-reward meal that feels like a warm hug at the end of a long week.
EQUIPMENT:
- Crockpot or slow cooker
- Large skillet or cast-iron pan
- Medium mixing bowl
- Cutting board
- Peeler
- Chef's knife
- 2 lbs boneless skinless chicken thighs (you can also use chicken breast, but you'll want to add another fat source to your crockpot, like bacon)
- 1 1/2 T smoked paprika
- 2 t salt
- 1 t pepper
- 1 T olive oil (or avocado oil)
- 2 lbs of baby red potatoes OR baby golden potatoes
- 1 lb carrots, chopped
- 1 medium onion, yellow or red
- 4 cloves garlic
- 3 cups of chicken broth
- Dry your 2 lbs of chicken thighs by patting with a paper towel
- Season your thighs: In a medium mixing bowl, sprinkle seasonings over your chicken thighs. 1 1/2 tablespoons smoked paprika, 2 teaspoons salt, 1 teaspoon pepper
- Halve baby potatoes, or cut into quarters depending on size. Because these are small potatoes, you do not need to peel them. 2 lbs potatoes
- Chop carrots & onions 1 lb of carrots, 1 medium onion
- Mince garlic. 4 garlic cloves
- Add the potatoes, carrots, onion, and garlic to the bottom of your slow cooker crockpot.
- Heat your cast iron skillet over medium-high heat, then add your olive or avocado oil
- Pan-sear your chicken for a few minutes on each side to a lovely golden brown, which will both taste good and help keep your chicken tender and moist while it cooks slowly in the crockpot afterward.
- Once seared, move your chicken to the crockpot. Also, add the grease and drippings from the pan.
- Pour in chicken broth, making sure to submerge the chicken. If you don't have chicken broth handy, you can use bouillon cubes or powder; follow the instructions on that packaging.
- Cook on low for 6 hours or high for 4 hours.


If your sister or best friend is expecting this year, snacks are the way to her heart! These are my favorite store-bought snacks, which offer a variety of sweet, sour, and salty options without requiring you to set foot in the kitchen and are still nutritious and gut-friendly to support pregnancy and postpartum recovery.
Fermented and Sour
Fermented snacks are a delicious and natural way to boost digestion, balance hormones, and strengthen immunity—all essential during and after pregnancy. From probiotic-rich yogurt to tangy sauerkraut, these fermented foods can help nourish your body and benefit both mom and baby. In this list, you’ll find the best fermented snacks for pregnant and postpartum moms that are safe, satisfying, and easy for her to incorporate into her daily routine.
Wickle's Wicked Okra
Yes, I did send my husband on a stereotypical pregnancy-craving-induced treasure hunt late at night to find my something picked and spicy.
Greek yogurt, like this Black Cherry and Honey flavored It's easy to top a tangy greek yogurt with granola and fresh berries for a calcium-rich snack
Spicy
Craving something with a little kick? If you're pregnant or navigating the postpartum days, spicy snacks can totally hit the spot—and yes, they can be safe and even beneficial in moderation! Whether you’re battling weird pregnancy cravings or just need a flavorful pick-me-up during those long newborn nights, this list of spicy snacks for pregnant and postpartum moms has you covered. From spicy hummus to chili-lime popcorn, these options bring the heat without the worry.
Ocean's Halo Thai Seaweed
These also tick the crunch box, and are healthier than spicy potato chips. Seaweed is one of the best natural sources of iodine, a mineral essential for thyroid function and your baby’s brain development.
Chili Roasted Pistachios
Since these are individually wrapped snack size containers, they're easy to throw in a diaper bag or purse. It's best to avoid too much sodium, so don't binge on these! Pistachios are a plannt-based protein with healthy fats, fiber, vitamin B, magnesium, and iron which all combine to help support your postpartum recovery and appetite.
Sweet
There's something about satisfying a sweet tooth during late-night feeds! I'm a big fan of these lactation oat balls that I make for myself and keep in the freezer because they don't require baking or too much time on my feet, and because I keep them in the freezer they last quite awhile.
But when I don't want to prep or cook, these are my go-to packaged sweets (that still tick a few "health" boxes). Many of them include ingredients known to support lactation, like oats, flaxseed, and even dark chocolate—so you can treat yourself and help your milk supply at the same time. From no-bake lactation bites to naturally sweet fruit-based treats, this list has plenty of mom-approved options to enjoy guilt-free.
Little Debbie's Oatmeal Creme Pies
Oatmeal is widely believed to be a milk-booster and while I may be stretching health benefits of these specific tasty treats, a bit of indulgence is okay in the newborn trenches.
Oatmeal is widely believed to be a milk-booster and while I may be stretching health benefits of these specific tasty treats, a bit of indulgence is okay in the newborn trenches.
Dark Chocolate Kit Kat bars (Walmart / Amazon)
These are the best KitKat bars and they are so rarely at the grocery or convenience store. If you see some in a checkout line, stock up! Or order some in bulk online
These are the best KitKat bars and they are so rarely at the grocery or convenience store. If you see some in a checkout line, stock up! Or order some in bulk online
Dark chocolate-covered cranberries
Flavonoids and antioxidants combine to fight depression, inflammation, and UTIs. Avoid the added sugars!
Flavonoids and antioxidants combine to fight depression, inflammation, and UTIs. Avoid the added sugars!
Pregnancy and postpartum are wild rides—sweet snacks can be a small but mighty way to fuel your body, boost your mood, and satisfy those intense cravings. Whether you're reaching for something to support lactation or just need a quick energy boost during the newborn phase, there's no shame in treating yourself!
Do you have a go-to sweet snack that got you through the tough days? Or a totally weird pregnancy craving you’d be brave enough to share? Drop it in the comments—I’d love to hear all about it!
These mini protein muffins are so good, you’ll forget they’re healthy! Mom-approved and kid-devoured: these protein muffins are a pre-breakfast and snacktime game-changer. Looking for a snack that satisfies your child's sweet tooth while sneaking in some nutrition? These mini chocolate chocolate chip protein muffins are a game-changer for busy moms aiming to provide healthier treats without the fuss.
 |

Chocolate Chocolate Chip Protein Mini Muffins
Author: Morgan
Preparation Time:
Cooking time:
Servings: 48
Category: Desserts
Author: Morgan
Preparation Time:
Cooking time:
Servings: 48
Category: Desserts
These double chocolate chip mini protein muffins are a mom-approved, kid-friendly snack packed with protein—perfect for busy mornings, lunchboxes, or guilt-free treats!
EQUIPMENT:
- Mixing bowl
- Whisk
- Mini mufifn pan
- Small cookie scoop
- Mini muffin pan liners
- Pastry brush *optional
- 1 1/2 C Unbleached flour
- 1/4 C whey protein (chocolate or vanilla)
- 3 1/2 T Cocoa powder
- 1/2 C sugar
- 1 t baking powder
- 1/4 t salt
- 1 t baking soda
- 1/3 C butter, melted and cooled
- 2 large eggs
- 1 1/2 t vanilla extract
- 1 C milk
- 1 C semi-sweet or dark chocolate chips. Full-size or mini.
- Preheat your oven to 350°
- Melt 1/3 cup butter
- Whisk your dry ingredients together: 1/2 cups flour, 1/4 cup protein powder, 3 1/2 tablespoons cocoa powder, and 1/2 cup sugar in your large mixing bowl
- Add in 2 eggs, 1 cup milk, 1/3 cup melted butter, and 1/2 teaspoons vanilla extract
- Stir in 1 cup (or more 😉) chocolate chips
- Prepare your muffin pan, either with cupcake liners or by using a pastry brush to grease your cups with the residual butter from the butter-melting bowl
- Use your cookie scoop to transfer batter into each muffin cup.
- Batch bake your mini muffins for 8-10 minutes at a time. I normally get 2 1/2 pans worth of muffins.
- Remove the mini muffins from the oven and let them cool in the pan for 2 minutes before transferring to a cooling rack.
- Store at room temp for up to 5 days in an airtight container or in the freezer for up to 2 months.
Learn more about the benefits of protein in children's diets from the American Academy of Pediatrics.
Tried this recipe? Share your experience in the comments below or tag us on Facebook @thenewlywedpantry!


Nutrition
Per 1 serving
Calories
755.44kcal
38%
Total Fat
1.23g
2%
Carbs
143.59g
55%
Sugars
1.23g
1%
Protein
34g
68%
Sodium
580mg
29%
Fiber
5.95g
21%
Saturated Fat
0.61g
3%
Monounsaturated Fat
0.07g
-
Polyunsaturated Fat
0.22g
-
Cholesterol
49.2mg
16%
Calcium
391.14mg
49%
Magnesium
44.68mg
12%
Potassium
375.68mg
11%
Iron
8.52mg
61%
Zinc
1.71mg
17%
Phosphorus
255.11mg
36%
Vitamin A
3.6mcg
0%
Vitamin C
0.19mg
0%
Thiamin B1
1.97mg
179%
Riboflavin B2
0.8mg
57%
Niacin B3
15mg
94%
Vitamin B6
0.24mg
17%
Folic Acid B9
81.6mcg
41%
Vitamin B12
0.55mcg
22%
Vitamin E
0.09mg
1%
Vitamin K
0.12mcg
0%
'Tis the season to be spooky, and why not celebrate with a dose of mummy wrap snacks? If you're throwing a Halloween party this year, these easy-to-make treats will make your guests feel wrapped up in festive fun. Not only are they adorable and delicious, but they also require minimal prep time—so you can focus on creating an unforgettable evening for your fellow ghouls and ghosts! Hosting a great Halloween party doesn't have to be complicated or time consuming. Keep reading for our step-by-step recipe and guide on how to make these incredible Halloween-themed pig in a blanket treats!
There are several powerful and healthy ingredients in this one simple Sweet Potato & Cauliflower Soup to boost postpartum health for mom and baby: sweet potatoes, spinach, cauliflower, and bone broth.

Spinach - like most if not all leafy greens - is high in Vitamins A, C, E, and K as well as fiber and calcium.
Cruciferous veggies (like cauliflower and broccoli) are often on the "don't" list for breastfeeding moms because they could increase symptoms of gas discomfort for baby. But this is mostly anecdotal so you'll have to trust your gut and monitor your baby's response when you've eaten a serving or more of these fiber-rich foods. In fact, cruciferous vegetables may boost milk supply in mothers with high estrogen levels and have high levels of Vitamin C, K, Folate, ALA Omega-3 fatty acids, and fiber.
Bone broth is an excellent source of collagen; it's hydrating; and can give your body a good dose of micro and macronutrients like calcium, phosphorous, sodium, magnesium, potassium, omega 3 and omega 6 fatty acids, iron, selenium, zinc, and vitamins A, B2, B12, and E.
There are two ways to make and serve a honey butter - gooey or whipped! In our honey butter chicken biscuit recipe, Abby shared her recipe for a gooey drizzl-able honey butter. If you'd like a version that you can spread instead of drip on any number of breakfast items, then this creamy whipped honey butter recipe is what you're looking for.
This easy 5-minute whipped honey butter recipe is sure to become a family favorite, so get ready!


You won't believe how easy it is to make this delicious Whipped Honey Butter recipe. You only need two ingredients, butter and honey! But I've included some extras that we like personally. You can serve it on any bread or sweet breakfast and your taste buds will thank you. (I'd personally try it on our Honey Butter Chicken Biscuits) The only planning ahead required is softening your butter.
EQUIPMENT:


This easy 5-minute whipped honey butter recipe is sure to become a family favorite, so get ready!

Creamy Whipped Honey Butter
Preparation Time:
Cooking time:
Servings: 10
Category: Sauce
Rating: 4
Cuisine: American, Southern
by Morgan Pashen at The Newlywed Pantry
Preparation Time:
Cooking time:
Servings: 10
Category: Sauce
Rating: 4
Cuisine: American, Southern
by Morgan Pashen at The Newlywed Pantry
You won't believe how easy it is to make this delicious Whipped Honey Butter recipe. You only need two ingredients, butter and honey! But I've included some extras that we like personally. You can serve it on any bread or sweet breakfast and your taste buds will thank you. (I'd personally try it on our Honey Butter Chicken Biscuits) The only planning ahead required is softening your butter.
EQUIPMENT:
- Handheld mixer or stand mixer
- Mixing bowl
- 1/2 Cup unsalted butter, room temperature
- 1/3 Cup of local honey
- 1/4 teaspoon of salt (optional)
- 3 Tablespoons powdered sugar (optional)

- Soften your butter to room temperature.
-
In your stand mixer or mixing bowl, beat your softened butter until
creamy and smooth, about 1 minute.
-
Beat in the honey
-
Mix in the optional powdered sugar and salt. The powdered sugar helps
the honey butter to get fluffier, and the salt helps balance and enhance
the flavor of the honey.
- Mix until fluffy, about 3-5 minutes
- Spread on your favorite toast, biscuit, or homemade bread and enjoy!


Don't waste a drop of that delicious honey butter! Store it in a
container with a tight lid in the fridge for up to three months. But
don't forget to take it out of the fridge 30 minutes before you plan to
serve it so it can get soft.
Nutrition
Per 1 serving
Calories
112.41kcal
6%
Total Fat
8.87g
13%
Carbs
9.24g
4%
Sugars
9.2g
10%
Protein
0.13g
0%
Sodium
1.65mg
0%
Potassium
8.45mg
0%
Iron
0.05mg
0%
Zinc
0.03mg
0%
Phosphorus
3.07mg
0%
Vitamin A
81.96mcg
10%
Vitamin C
0.06mg
0%
Making your wedding or housewarming registry can be so daunting! These are the
kitchen tools in my small-ish kitchen that we use almost daily and I forgot to
include them on my own registry. Use this list as a starting point to brainstorm
what you'll use in your own kitchen! Then, find some you love the look of and
are high-quality that will last you through a couple moves and fit in almost any
kitchen.

3. Air Fryer
*This post contains affiliate links. If you use these links to buy
something we may earn a commission. Thanks for supporting NWP!*
7 Kitchen Registry Must-Haves
1. Wooden cutting board

|
| IRONWOOD Everyday Cutting Board, Sapwood, 10"x18" at Target |
If you're a home cook, you'll quickly learn that you need to slice,
dice, or chop something for just about every meal or snack you prepare
at home. Get a durable thick cutting board like this IRONWOOD Everyday Cutting
Board, Sapwood, 10"x18" that won't slip on your countertops and can handle daily
use.
2. Corkscrew

|
| Berghoff Stainless Steel Corkscrew at Saks Off 5th |
I learned the importance of always having a corkscrew handy while at a
bachelorette weekend in the beautiful Texas Hill Country. We stayed at a
gorgeous home in Fredericksburg walking distance to their downtown, and
after a day of winery tours and good food, we meant to relax with games
and the wine we had purchased - but the rental had no corkscrew! (A
serious oversight in the heart of Texas wine country, if you ask me.) So
save yourself from having to make a last-minute run to Walmart when your
guests have already arrived and the party is ready to start by including
a sturdy corkscrew
on your wedding registry.
3. Air Fryer

EliteDigital 5.3 Qt Electric Hot Air Fryer with XL Capacity
1350W at Macy's
When my in-laws gifted us an air fryer, at first I didn't know why
we needed one or what we would use it for. Turns out - it's for just
about everything! Which makes an air fryer a definite must on your
registry or housewarming wish list.
Since we don't have a microwave, an air fryer is an easy way to
reheat most things - chicken wings, pizza, french fries,
pancakes. And it's also an excellent way to cook & prepare many meals -
egg rolls, pepper poppers, brats & sausages, and so much
more.
Since our air fryer is ever present on our kitchen counter (I tried
storing it away and bringing it out only when in use, but we use it
ALL. THE. TIME.) pick one you like the look of and is the most
utilitarian size for your meals and your space. We've also invested
in some air fryer accessories like
this collapsible silicone air fryer basket and even
this air fryer cookbook from Better Homes & Garden that make using your air fryer to its full potential even
easier.
|
|
| EliteDigital 5.3 Qt Electric Hot Air Fryer with XL Capacity 1350W at Macy's |

4. Stock Pot

Cobalt Swirl Enamelware Collection 18 Quart Stock Pot at Macy's
A good stock pot is up there with a good knife; it's
utilitarian, so you can use it for much more than soups and stocks.
There are several sizes and materials to choose from when picking a
stock pot -- or set of cookware pots and pans for your kitchen - so
these are my top considerations:
Material - do you prefer stainless, non-stick, enamel, cast iron,
or ceramic cookware?
Utensils - do you have bamboo, stainless or cooking utensils? The
wrong tools with the wrong cookware can actually damage your
cookware (like using metal on non-stick pans can scrape and
scratch).
Weight & dimensions - I have a 10 QT stainless steel stock pot
that I use primarily for boiling a whole chicken, steaming veggies
with the coordinating steamer tray, and water canning. It is tall,
it is necessary, and when in use it is HEAVY. So when it's time to
drain or pour, I normally call in the husband to handle the bulk and
weight. My
5 QT stainless stock pot
is much easier for me to handle, and I reach for that one more often
for most stove top meals.
|
|
| Cobalt Swirl Enamelware Collection 18 Quart Stock Pot at Macy's |
A good stock pot is up there with a good knife; it's utilitarian, so you can use it for much more than soups and stocks. There are several sizes and materials to choose from when picking a stock pot -- or set of cookware pots and pans for your kitchen - so these are my top considerations:
5. Garlic Press
Fresh crushed or pressed garlic goes into just about every dinner I
prepare at home - so much so that B had to get used to the amount of
garlic goes into my and my mom's cooking 🧑🍳
So when my
Pampered Chef garlic press
broke after 10 years of use (it was on my first apartment
housewarming list when I was in college) on a
monster garlic clove, I replaced it almsot immediately
with the newest Pampered Chef garlic press. In the interim, I used
a garlic grate plate
that has been decorative for years (and was impressed!).
6. Spoon rest

A spoon rest may sound like an odd and simple thing to ask for, but
it's one of those items that if you don't have one, you'll wish you
did! I've used two styles ever since I've had my own kitchen and
they both have pros and cons. If you get a vertical rest, they take
up less space on your stovetop or countertop. If you get a more
traditional spoon rest, it takes up more space but while cooking it
feels a little more natural to me to lay down the spatula or spoon
instead of having to prop it up.
Find one that goes with your kitchen decor; I favor simpler
countertop items, like this
spoon rest from Anthropologie
because the real estate is so sparse and it keeps things looking a
little cleaner while I'm cooking!
7. Tupperware lid organization


|
| photo via Amazon |
We've all seen the grainy black-and-white infomercial videos where an
unsuspecting homeowner opens their cabinet only to have every single item
topple out on top of them. An unorganized Tupperware mess can quickly make
you feel like you're living in your infomercial nightmares.
Congratulations – you’ve chosen the perfect kitchen gadgets for your
registry list! A corkscrew, spoon rest, air fryer oven, and other often
overlooked must-have items are sure to make your kitchen a happy place. With
these 7 kitchen gadgets, you feel equipped to tackle any cooking challenge
that comes your way.
What kitchen tool or accessory did you have on your registry that we didn't
include here? We'd love to hear about it!

Search This Blog
Bonjour & Welcome
Welcome to the Newlywed Pantry! If you're looking for grocery tips, delicious recipes for you and your love, or just pictures of yummy meals you've come to the right place.
Hello!

Morgan Pashen
Working Wife
By day I'm a project manager & social media specialist for a digital agency. By night I'm a two-stepping, salsa-dancing, baked-goods chef that spends too much time eating with friends and collaborating with local photographers & other creatives. Read More

Abigail Biggs
Chef-to-Be
Too busy compiling recipes and being a dog-mom to write a more intriguing mini-bio. Read More
Popular Posts
-
 These yummy egg-free brownies came from a desperate need for chocolate when my college roommate and I were super budget-conscious and our...
 -
 There are several powerful and healthy ingredients in this one simple Sweet Potato & Cauliflower Soup to boost postpartum health for mom...
 -
 Honey. Butter. Chicken. Biscuits. Just let it sink in for a minute. They're delicious. They're the beard's (AKA the husband) fa...